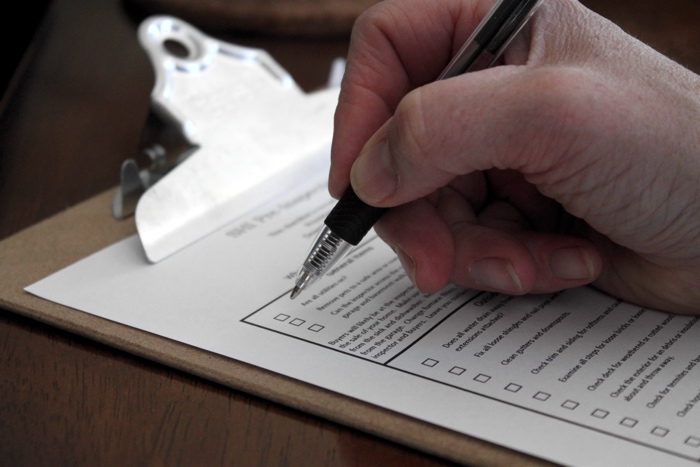
Selling your home is stressful. There are so many moving parts and many things that we just cannot control. But, there are areas that we can improve to help reduce some of the stress and unknowns. Today we will examine the inspection for the home that we are selling and what we can do to reduce items that the buyer may request for remedy.
Some of the items that we will discuss may seem very much like common sense. They are, but we don’t buy and sell homes every day, so we need some guidance to make sure we do all we can to make it as successful possible.
Why do we want to be so concerned about the inspection on your home? Well the obvious is that we may be able to reduce items that are requested for repair and thus the cost of selling your home by simply doing a few maintenance items. Reduced cost is always a good idea but the maintenance items will also prepare you for what to look for in the home inspection you’ll need before the purchase of your new home. As you go through the list of items we will discuss (the checklist linked below), you will have a better idea that, even your home that you think is safe and in good repair, has more items to address than what you thought. That realization will help us to frame the inspection report for your new home properly and in context.
General Items
Make sure all the utilities are on and running. If we are living in the home we’re selling, well that’s easy, but sometimes we are selling a second home or a rental. Utilities include the water, gas, and electric. Move your lovable pets to a safer area of the home or better yet remove them from the house completely. We love our pets, but we want to make sure they are safe and out of the way for the inspector to complete his work. Reducing commotion and stress for the buyer is always in our best interest. Make sure that we know where the utilities are and that the access is clear for the inspector. We may think that the inspector will just move what needs to be moved, maybe, but in general they will not move anything in a home they inspect. The reason is that there is a liability that is attached to moving things in the home of a seller. So the scope of work includes only accessible and visible items. If we have access clear and available we will not have to make arrangements for a re-inspection of that particular item in the next few days and it will help avoid any buyer frustration.
Additionally, you will want to make sure your home is clean. When the inspection is scheduled it likely is done so the buyer can be present. This means it is another show case of your home and another opportunity to sell your home or reinforce the sale. Another item about a clean home is that it goes toward how the home may have been cared for before we decided to sell it. It may impact the comfort of the buyer in a positive way. A clean home would include no dirty dishes in the sink or the dishwasher and remember to remove stored items from the oven. We would also want to move cars from the garage and change our furnace filter (more about this later). Finally, you may consider a few refreshments for the buyers, the broker and the inspector. You can discuss this with your broker, but anything that makes the buyer feel good, not just about the home, but also about the kind of people we are, will help to create a better buying atmosphere.
What else may we do to make the process easier? Have your number available for the inspector to call to ask questions that may help complete the inspection. If there are items that need to be clarified, review them with your broker and add a note to the inspector.
Now let’s get to work on specific items.
Outside Your Home
Drainage. There are several things on the outside of your home that will need your attention in preparation for a buyer’s inspection. Check the lay of your yard around the house, does it drain away from it, are there pools of water or the evidence of pools of water? If water drains toward the house, re-grading the yard so that proper shedding of water is possible.
Roof, siding, and deck and porches. Examine the roof (or have professional do so) for missing or damaged shingles. You will want to look for nails that have backed out and if the nails on the ridge cap shingle are sealed. Look at the gutters and downspouts, do they require cleaning? Are the downspout extensions attached and not damaged? As we examine the siding, are there any areas of softness or deterioration or rotting that needs to be addressed? How does the caulking look around doors and windows? Is it cracked or deteriorated? Does it need to be replaced? Are all steps and handrails secure and solid? What condition are the deck boards in? Also, check that all the exterior outlets have proper exterior enclosures and that they all functioning properly.
Yard, water, and bugs. Take a walk around your property and make sure it is clean and presentable. Your buyer looks at hard costs, but also at the soft costs of clean up and ease of possession as well. Do we see and evidence of termites or wood destroying organisms that need to be eradicated? Are any of the hose bibs leaking and do they need to be switched to anti-siphon hose bibs? If you have a sprinkler system, does the back flow preventer leak? (Technically the sprinkler system and all components are excluded in the scope of work form a home inspection, but most inspectors will add any leaking pipes in the report)
Garage
As we move to the garage, there are only a few items that will we want give attention to. Does the automatic reverse on the opener work properly? Do the IR sensors operate correctly? Walk around the garage and examine the foundation for termite tubes. Move items away from the wall to allow easy access for the inspector. Check the sheetrock or drywall for damage that will require repair.
Inside Your Home
Go around and ensure all windows operate correctly and that they lock properly. Also, do they stay open on their own? Are any broken or are any of the seals broken? Are all the screens in place or available, do they need repair?
Walk through the house and inspect all the walls and ceilings for damage that will require repair. Especially be aware of where door knobs may damage a wall. If we have a ceiling fan, run it through all the speed cycles and look for wobbling or if they are out of balance. Do any light bulbs need to be replaced? Is the carpet clean?
Does the carpet have wrinkles in it, does it need to be stretched?
Kitchen and bathrooms. If there is one area of concentration that we need to be acutely aware of it is definitely your kitchen and bathroom. Here are a few items to look at and remedy if needed.
Do any of the sinks or sink drains leak? Look for evidence of a leak. Fill the sinks up as full as they will go and then drain them. This will help to see if you have a leak in the sink itself or in the drain pipes. Run the garbage disposal and the dishwasher, is there any excessive vibrating or is it loud? Turn on the water and determine if the aerator needs to be replaced. Do any of the faucets leak? Examine the counters and backsplashes for deteriorated caulking that needs to be replaced or repaired. Work every cabinet drawer and door. Do any stick or rub or work incorrectly?
The laundry is another area that we should give attention to as well. What condition are the supply hoses to the washer appear to be in? Are they cracked or leaking? Repair as needed.
The water heater also should be examined. Is there any corrosion on any of the pipes? Is there a TPR valve pipe installed? High up on the side of the water heater, there will be a valve (generally copper). That valve should have a drain pipe installed on it. Is there corrosion on the bottom of the water heater.
Finally, if you feel comfortable doing so, take a look at the electrical panel (do not remove the front of the panel unless you are trained to do so). Open the front of the panel. Are all breaker identified as to what they are dedicated to? Are there any missing knockouts exposing the inside of the panel? Are any breakers missing or tripped? Test the GFCI (ground fault circuit interrupt) and AFCI (arc fault circuit interrupt) breakers for proper function.
Ready For the Inspection
We want your home to sell as fast as it can. And there are things you can do to help make that quicker and easier. Below is a checklist based on the items we discussed above. After walking through all the items we will be more prepared for the buyer’s inspection. It will also prepare you for the inspection before you purchase your new home as well.
As we work through these items, remember that safety should be vitally important to us. All too often we do things at home we would never do on a job site or at work. But, really safety should be a concern to all of us all the time. Our life is precious, not just to us, but to those who love us as well. 18,000 Americans die each year from accidents in their homes. We should always know our limits and be safe.
Sellers Pre-Inspection Checklist
First, let’s make at distinction, its Strouse Home Inspections, not Strauss Home Inspections. I don’t know when it got switched but it was sometime before 1900. We traced our family back to southern Indiana in the late 19th century. We have not determined if we are a part of the Johann dynasty, but we did go to his birth place in Vienna, Austria and got the picture below, just in case.

For most of my professional (and not so professional career) I have been in construction of some part or another. Everything from swinging a hammer to designing data centers for companies all over the world. The not so professional part of my career was while I was a teen and worked with my father in his general contracting business, I said it was free labor, he called it room and board. Either way, I learned a lot from him as we finished basements, built agri-buildings, homes, Goodyear stores, and hotels. I slopped a lot of footer trenches, cleaned many a concrete form, carried literally tons of drywall, and pushed more brooms than I would like to remember. But I also ran a carpentry crew and swung a hammer, ran electric, soldering copper for water, put on roofs, set trusses, set concrete forms, and did finish carpentry.
After I married and was starting my family I began to work for a major data center manufacturing company. I was involved with designing and building data centers (rooms that hold all the computers / servers that run the company) that were small enough to fit into a closet to data centers so large they were the size of football fields. That included designing the power and cooling of the space as well as the management tool to help run it all when we finished building it.
As you might imagine, I have had experience in helping many kinds of people and solving many kinds of problems both residentially and commercially. Regardless of what we built, the helping is always what I enjoy the most. That is way I am an inspector, to help people.
I still have that family, same high school sweetheart and 3 girls. So, like all of us, I work for support them and our interests. But, in our company as we help others, it makes what we do more fulfilling. From the first time home owner to the twilight couple buying their last home, they all want to make sure the money they are spending is well spent. They want to make a good financial decision. That is why a good inspection is so important and why I enjoy what I do so much.
When purchasing an inspection and evaluating the new home you are thinking of purchasing, there are a few things to consider. The “inspection” phase of the purchase is more objective than subjective. The inspection is primarily for “health and safety”. The inspection will produce more information than you expect. Your broker will help you sift through the inspection report for the most important items to be concerned about.
The inspection should be an objective look at the home. The home is your dream home or just the “right” home whatever drew you to it is the subjective part. When an inspector comes and does the inspection service, he will be as objective as he can be in giving you information about the condition of the home. He will be looking for as many defects in the home as he can find, not all will be related to health and safety. When you review the report, do so with your broker. They will help you to categorize each item in the report. For instance, all health and safety items together, all major expense items (>$15,000) together, all medium expense items ($500 - $15,000) together, and all minor expense items (<$500) together. Your broker will then discuss which items to consider negotiating with the seller on.
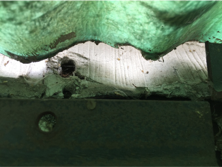
So what are health and safety items? Well they include and electrical items that could potentially cause harm or fire, plumbing leaks or poor installation items, roofing defects, HVAC service or installation concerns, structural issues and trip, fall or overhead obstacles. Notice a few of the items that we have seen:

Rubber grommet for a roof protrusion, the water was making it all the way to the basement
Asbestos siding and the awning was not connected to the home, both safety issues.
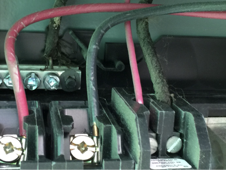
Scorched or over-heated wiring.
Structural issues are always a safety issue.
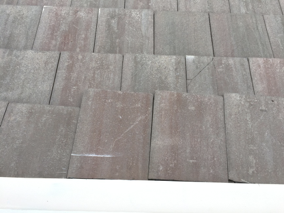
Roof tiles falling off the roof.

High moisture in the crawl space.
All of the above picture show health and safety items that a quality inspection should identify.
Do not be overwhelmed with the number of defects the inspector finds. Think about your own home and see if the items found by the inspector are items that you may need to give attention to. Take the items as a “to do list” or maintenance items that you can systematically work through. Regardless of the age of the home, new or 100 years old, the inspector will find defects. Categorizing them will help you to not be overwhelmed. As the inspector is doing the inspection ask questions or at the review ask questions to clarify the findings. One important aspect of purchasing a new home is to know and understand your competency in home construction and repair. If you are a “do it yourselfer” you know what you can do and not do. If you do not have much construction or maintenance experience, be honest about your ability with yourself and to your broker. That will help to find homes that will fit your ability. It will also help you not to be overwhelmed by the report. Your broker is not an inspector, but they have good experience spotting what will fit your capabilities if you convey it to them.
The inspection as an objective report is only a part of the information that you will need to consider when purchasing a new home. It will help give you a clearer financial picture to base your decision on. As an inspector, you are our client, not the broker. We want to do thorough inspections to give you the information that lets you make the best financial decision possible.
As an inspector, one of the dirties, grimiest, spidery-webbyest, places I go is in the crawl space. Most of the time the home buyer says, “take lots of pictures and let me know if there’s a problem”. Crawl spaces have many uses and reasons they are part of a home design. Let’s discuss why we have them, what challenges there present, and then how to manage them.
Why do we have them in the first place? Can’t we have either a basement or a slab? Well, we could have one or the other, but there are several reasons, good ones, to have a crawl space. The main purpose of a crawl space is to promote air circulation through the home and to allow access to critical support systems. Such as electrical wiring, plumbing (which may include the water heater), and the HVAC (Heating-Ventilation-Air Conditioning) system, these would take up needed space in the main living area. What we give up in convenience we make up for in convenience (what?). We may give up easy access to the HVAC system to gain 20 square feet in the kitchen, likely a good trade.
There are several challenges that we face in managing the crawl space.
Active management:
The first challenge is our own mind set regarding the crawl space. Nobody wants to go down there! Right? We should really think of the crawl space as part of the body of the home. If that part of the home is not as well maintained as the rest, it can bring the whole thing down (health-wise). Essentially have a plan, do your research, and manage it effectively. Make the crawl space a regular part of your home maintenance program. Out of sight and out of mind, in general, does not keep bad results away.
It’s Dirty:
The crawl spaces that I inspect generally have either a dirt or gravel floor (occasionally they will be concrete). Being of a dirt floor it can be, well, very dirty and dusty. One of the main issues that it presents is that the HVAC system many times is also located in the crawl space. That may mean more maintenance on the unit to keep the air that flows through nice and clean for the entire home (yes the duct work is “normally” sealed, but over time duct can loosen and fall apart if not well maintained). Even if it is not pulling dust into the home, dust and dirt do settle in the working parts of the unit. That can shorten the active life of the unit. Taking steps that will reduce the dust in the crawl space will make your systems cleaner and run longer.
Sure is moist down here:
Yep, it’s more humid in a crawl space than outside in the open. It’s all about dew point, well sort of, and some other issues. There are three main reasons it is humid in a crawls space.
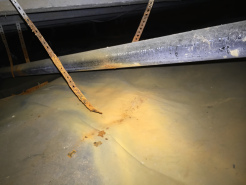
The first is bulk water. If there is standing water in your crawl space you either have a drainage issue or a plumbing leak, either is problematic. As you can see below
That standing and moving water can make the whole space wet and humid and that can lead to the formation and growth of the “M” word………mold.
The second is ground moisture. Soil can be constantly evaporating water, that water begins to attach itself to everything in the crawl space. Which can lead to growing things, well, all over the place.
The third way, believe it or not, is from the outside air. As warmer air from the outside enters the crawl space, it begins to cool. If the outside temperature is 90 degrees and the relative humidity is 60% and that air then travels into the crawl space and cools to 75 degrees, the humidity goes up to 95%! Dew point is when that air cools off to a temperature that the relative humidity is 100%, that is when you will see water dripping off items and it seems to be coming from no where. Cool air holds less water than warm air and it has to go somewhere, so in the right conditions, it begins to attach itself to everything in the crawl space. Then, when not addressed, it can breed the perfect environment for cultures to grow.
The crawl space has a lot of organic materials, wood, boxes, paper, we store all kinds of stuff down there! When it gets wet, we don’t just loose memories, we can endanger our health.
There are several ways to help reduce the moisture, dirt and dust in the crawl space. First is to call a professional, they can assist you in making the right decision for your home.
The options may include how to correctly vent the area using the vents on the side of your house. It could include how to use your HVAC system to assist. Most likely they will recommend sealing and dehumidifying in one way or another. Fortunately here in Colorado, dehumidification needs are lower. That does not mean, non-existent. Below is a set of pictures showing a small crawl space under an engineered basement floor, notice all the rust. Some of the metal strapping is rusted through, causing a low spot in the main sewer drain. Not a good situation.
Even if you choose to not call a contractor for help in managing your crawl space, you should at lease monitor it with a thermo-hygrometer. What? It’s a sensor that can monitor the temperature and humidity levels in the crawl space. It can even do it remotely. Sweet! Hop on Amazon.com or your favorite online store and you’ll find the one that best meets your needs. It may be some of the best money you can spend to prevent or find potential moisture related issues in the crawl space.
As with most things in our lives, when we have the right information we make better decisions. Call a contractor, get several quotes and ideas. If you are a do-it-yourselfer, be careful and thorough, you family’s health is involved.
When you have a clean and waterproof crawl space, you have a clean and healthy part of the house that is not as scary as it used to be. It can also be a more useful part of the house now. One that can be used for storage for items that are not used very frequently.
As the old “Red Green” show would say, we might not be handsome, but at least we can be handy. I hope you found this entry handy and useful.
Jeremy
Older homes can have some crazy things that home owners and buyers of more modern homes likely don’t have to face. Roof Extensions
In a recent inspection of an older home that was “rehabbed” there was a unique configuration for the extended roof over a back porch. See the picture below:
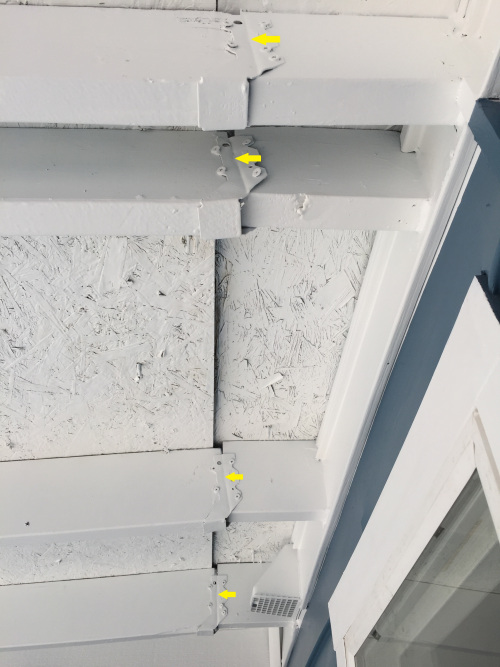
Above shows how not to extend roof rafters. First, in this example, a previous home owner used joist hangers that were straightened out as a way to attach the extension rafters to the existing rafters. The yellow arrows show where the hangers were bent straight. The roof also looks like it is out of align. In the Denver area, how much snow load will this configuration actually take. For that matter, would it hold if someone who walked on the roof?The picture below shows how a joist hanger is supposed to look and work.
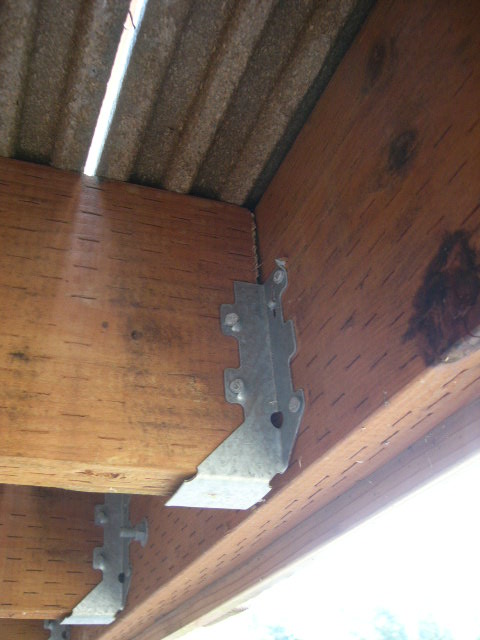
As you can see the joist hanger is attached to a ledger board and has a 90º angle on the back side to attach perpendicularly.
So, how do you extend rafters? The best way in this case is to sister the new section of rafter to the existing rafters. What is sistering? Below shows you one way to accomplish roof extensions by sistering the rafters.
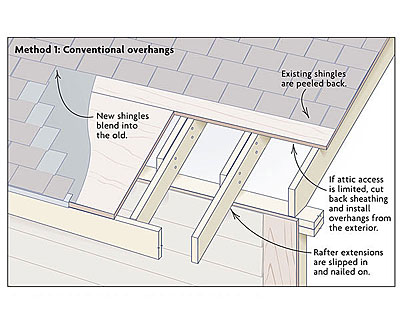
The rafter extensions are attached to the existing rafters that go back into the roof area. How long should the sistering rafters be? In general (see your municipality building codes) the overhang should have a ratio of 2 to 1. For every foot of roof rafter extension, there should be 2 feet of sistering of the rafters. In addition to the sistering the new roof addition, there will likely be a requirement for support posts.
Inspections are designed to identify safety and function items that buyers need to be aware of regarding their perspective new home. Rafters that are extended in the above manner are a safety concern. An inspector will likely suggest that a carpenter or an structural engineer be consulted to find a solution that will make this situation safe.
Till next time.
Jeremy Strouse